Introduction to Foreflight features. Basics tutorial for beginners.

The sun is shining, and it’s perfect VFR flying weather. So, you’re strapped in and powering up your aircraft. You check your gauges and meters, and all the readings are good.
You also have your trusty digital copilot right by your side—your Foreflight-equipped iPad.
The ADS-B In receiver is also secure in its mount, and you see the soothing green lights, indicating excellent ADS-B and GPS reception. The battery is in good shape too.
There is one hitch, though. Maybe you weren’t born in the right decade, or the conditions needed to be corrected, but you somehow missed the boat when everyone suddenly became tech-literate.
Android, EFB, iOS? It’s all just gobbly goop to you, and you are scared to go down the rabbit hole.
Well, you’ve got to.
It’s time you started integrating mobile smart devices into your flying routine. They’re here, and they’re not going away anytime soon.
The good news, though, is that we have got your back.
We’re here to walk you through how to set up and use your ADS-B In receiver with your iPad, and it’s much easier than you may think.
Of course, there are different brands and systems in the market, but they are all somewhat similar.
Let’s focus on combining two of the market’s most popular and widely seen products to ground our discussion as much as possible.
The following will present a step-by-step how-to guide on using the Foreflight application on iOS with the Sentry Plus ADS-B receiver.
As a combination, this is extremely popular. Moreover, what we explain will be transferable to other popular ADS-B receiver and flight app combinations.
So, please take out your notebook, and let’s get cracking.
Connect your Sentry Plus to the Foreflight App and Complete the First time Setup.
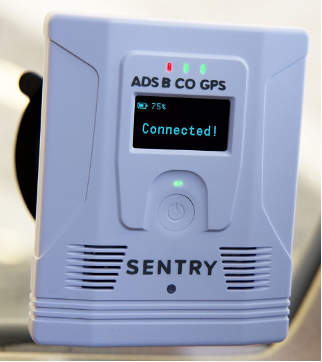
So, the nice thing about Sentry devices is that they have one button on the face of the device—press that to switch on the device.
The three status lights on top of the device should light up.
GPS and CO should be green, indicating good GPS reception and safe Carbon Monoxide levels.
Don’t worry if the ADS-B light is red. As you are still on the ground, you shouldn’t expect to be in the range of any ADS-B towers.
If you are using your Sentry device for the first time, you need to connect your iPad to Sentry’s WiFi network by opening the iPad’s settings.
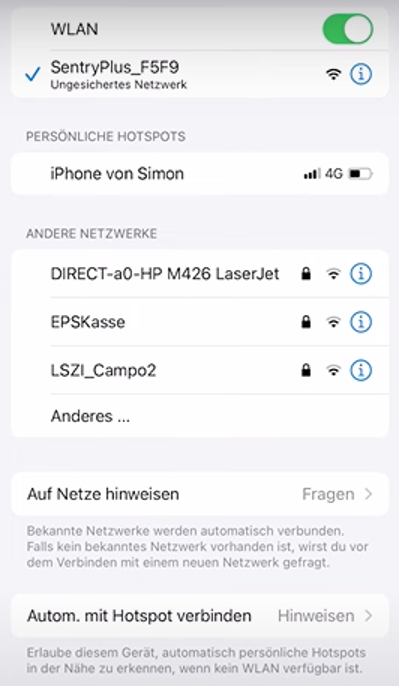
Now that your device is connected, you can open the Foreflight application. After opening the application, you will be prompted to fill in the device setup settings:
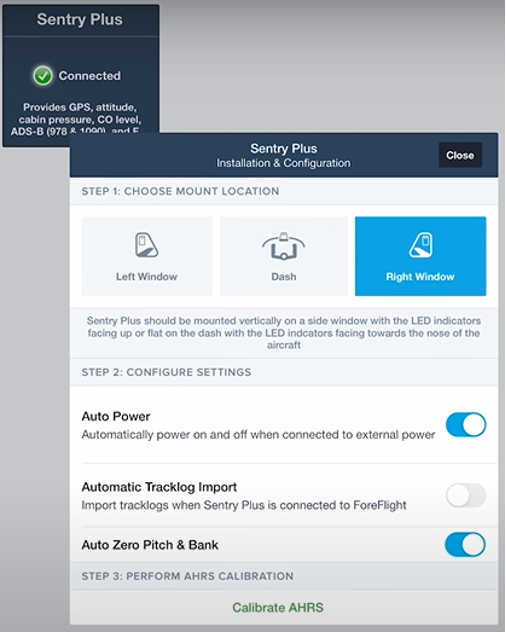
Continue setting up the device and calibrate the Sentry Plus’ AHRS. The bottom right of your screen shows you the accuracy of your GPS readings. The Sentry Plus’ OLED display shows the same information.
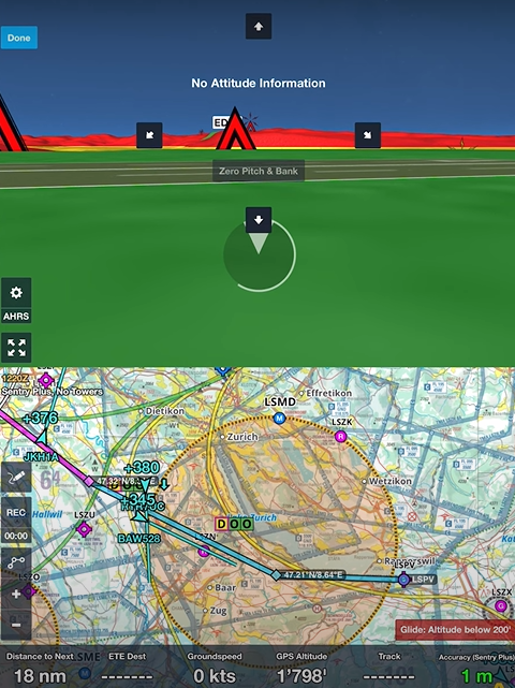
After calibrating your AHRS and finishing the first-time setup and configuration of your receiver, it’s time to start to get familiarized with the Foreflight app and how to use it in combination with your ADS-B receiver.
How to use Foreflight?
Let’s start from the very beginning. Opening the Foreflight, you should see the following tabs at the bottom of your screen.
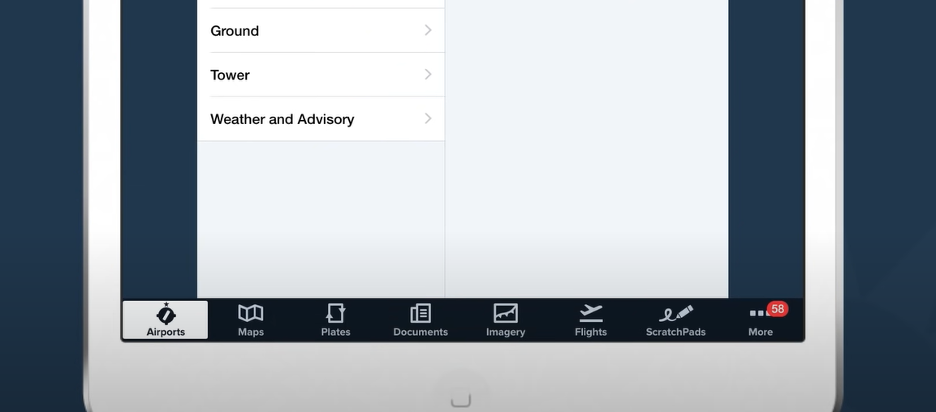
We will start with the leftmost tab, “Airports,” and see what happens when you click that.
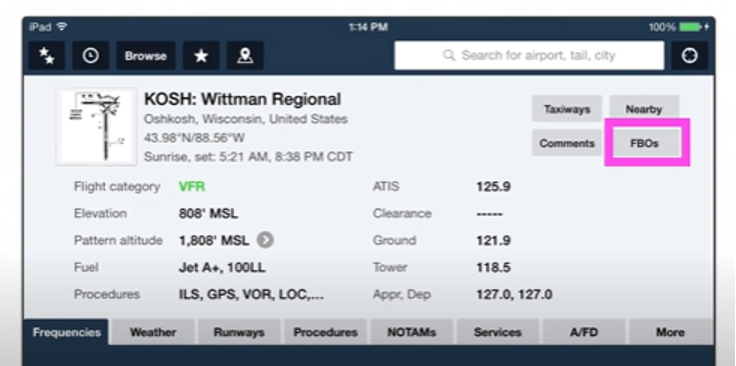
Opening the airport’s tab, you will get a screen that looks something like this:
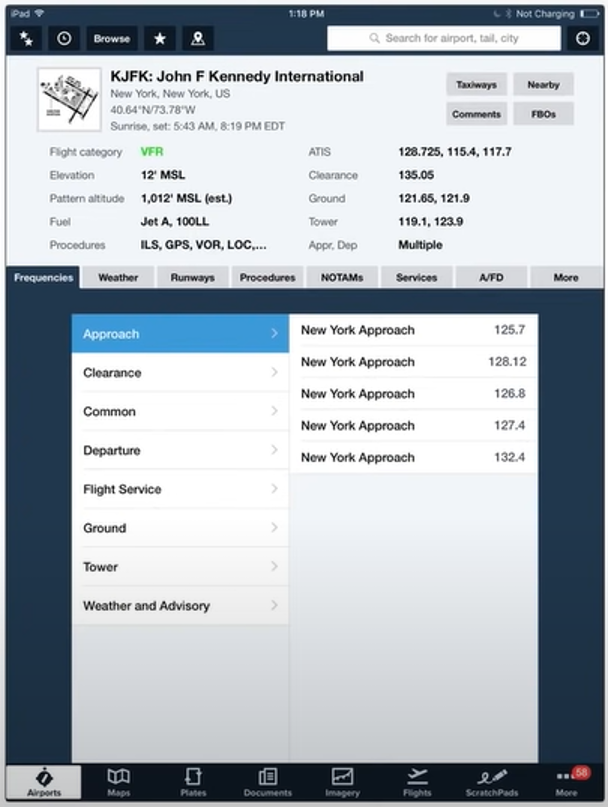
At the top of the screen, you will find a summary section of your chosen airport. If you want to select a different airport, type the airport identifier into the search box and hit enter.
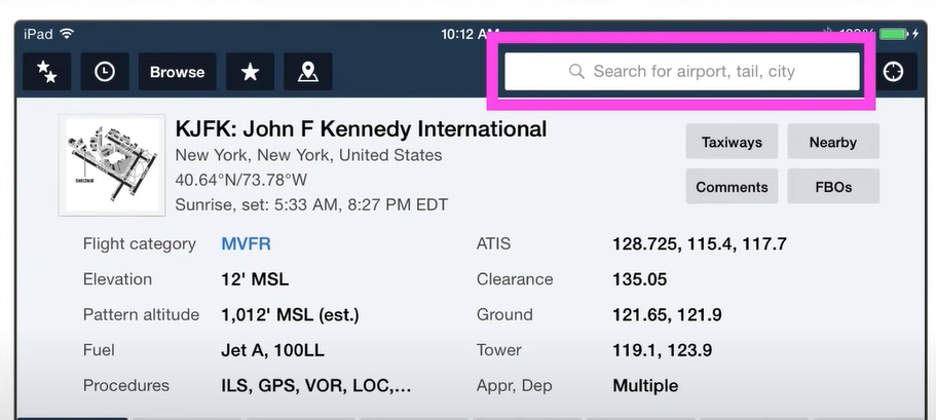
As you can see, the top view has a thumbnail diagram of the selected airport. It also has the airport’s identifier, name, and location.
The summary box also has a bunch of other helpful information, such as the flight category (VFR, MVFR, IFR, or LIFR) according to the current METAR, fuel and procedures for the airport, and standard frequencies.
Beneath the overview is a set of tabs that let you go into more detail about each category.
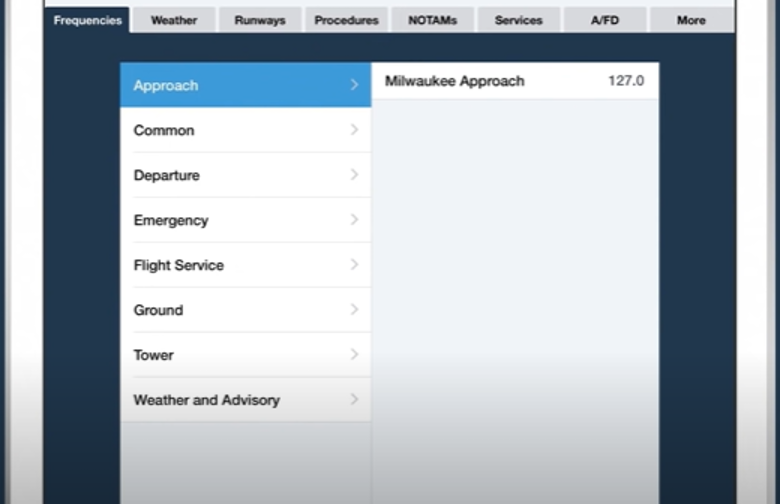
Each tab lays out the views in a two-column style. For example, looking at the weather tab, you have the different weather products for the airport on the left and the weather information on the right.
Beneath the raw METARs, you have the translation. The METARs report accompanies by a time stamp on the top right to give you a sense of the recent information. Note that the METARs are color-coded according to the conditions that are reported.
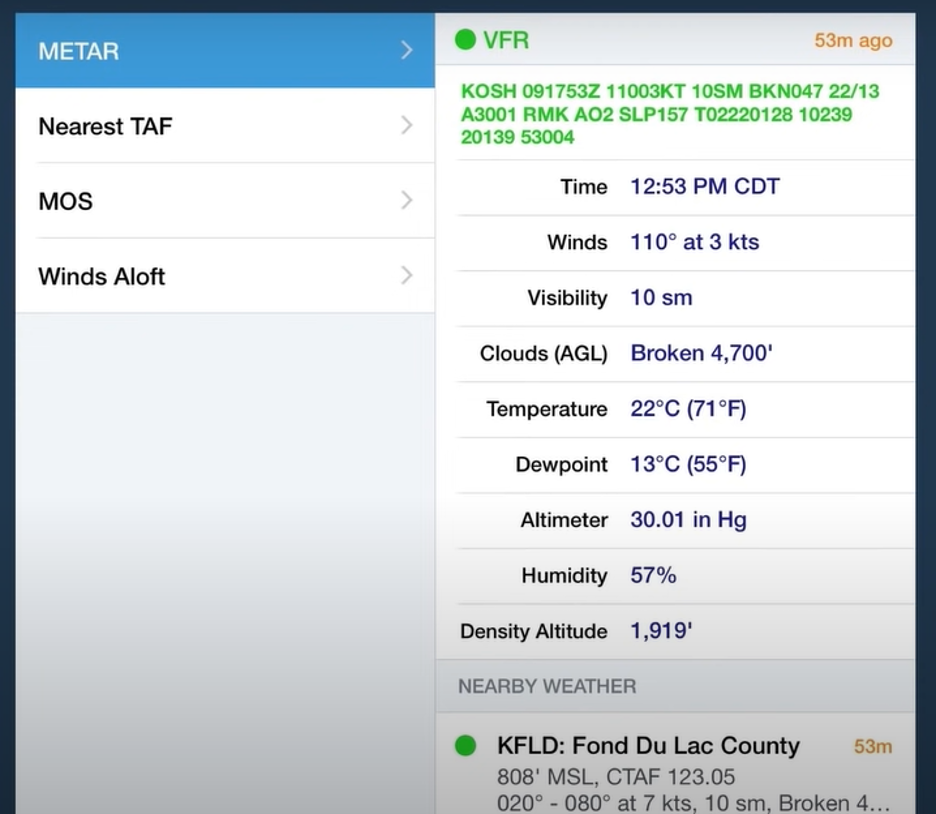
Underneath the METAR is the TAF. The nearest TAF will be displayed if the selected airport does not have a TAF. The TAF and other weather product reports are displayed on the right side of the screen in a similar format to the METAR data.
By choosing the Runways tab, you will find everything you would expect to see in the airport’s facility directory and some innovative features. Based on the runway direction and the current METAR, the app will automatically show you the wind components for each runway. In this case, for Runway 5, we have a 7 kt crosswind component and a 5 kt headwind component.

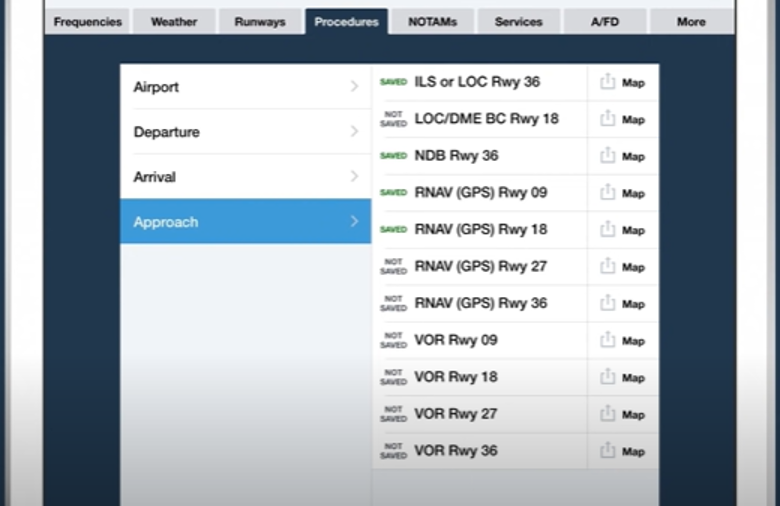
The procedures and other tabs are arranged similarly in a split-screen view. On the left, you have the categories of information, and on the right, you have the data itself.
Depending on the data type, you can click on the information on the right to get expanded views, including airport diagrams, approach plates, and other representations.
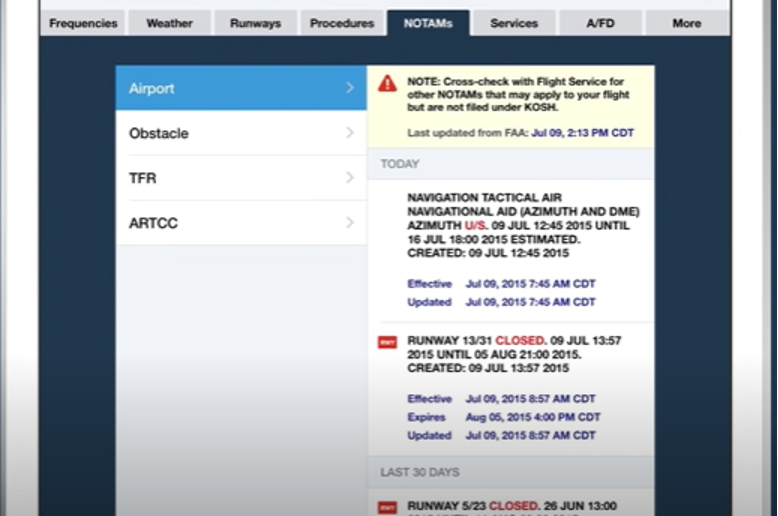
The NOTAMs tab is organized by categories: Airport, Obstacle, TFR, and ARTCC.
The categories are listed by time, so you can see information directly relevant to you at the time of viewing and their practical and updated times. Critical aspects of each NOTAM are highlighted in red.
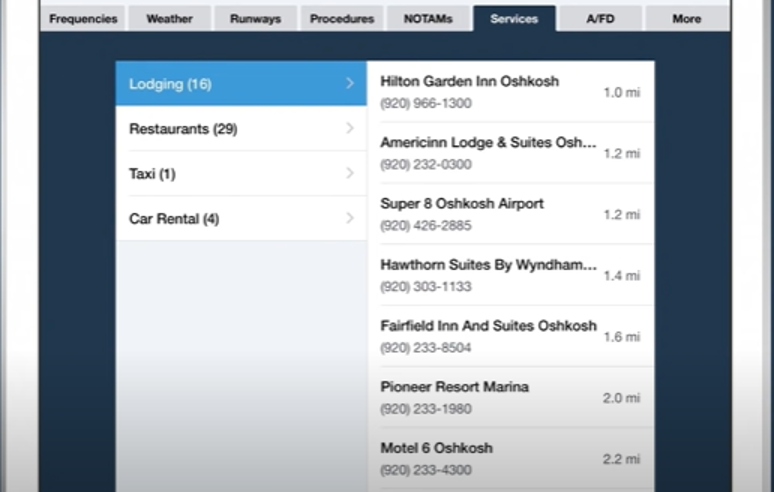
The services tab is helpful if you go to an unfamiliar airport because it shows you lodging, restaurant, and other services at your destination. If you open up this view from an iPhone, you can call the business listed directly by tapping on them.
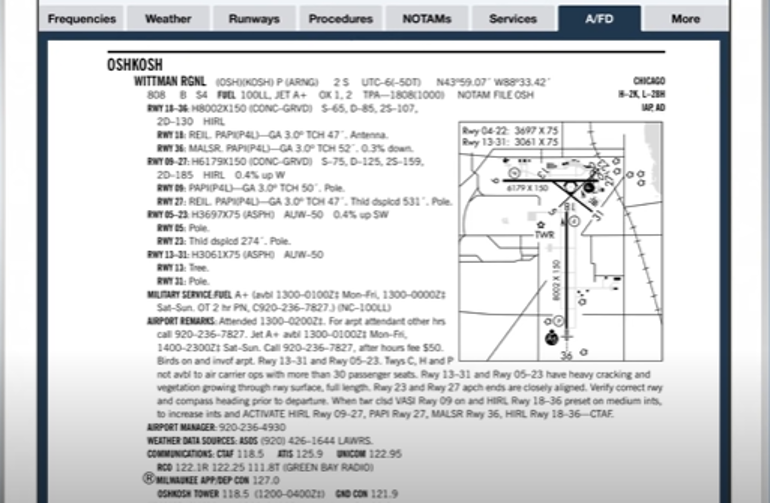
Choosing the A/FD tab will display the Airport/Facility Directory information for that airport for pilots who prefer information in that format.
Another valuable source of information is the FBOs button on the top right-hand corner of the airport summary view.
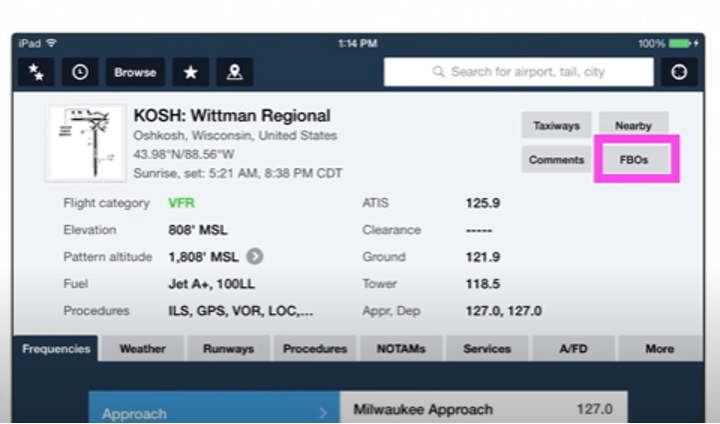
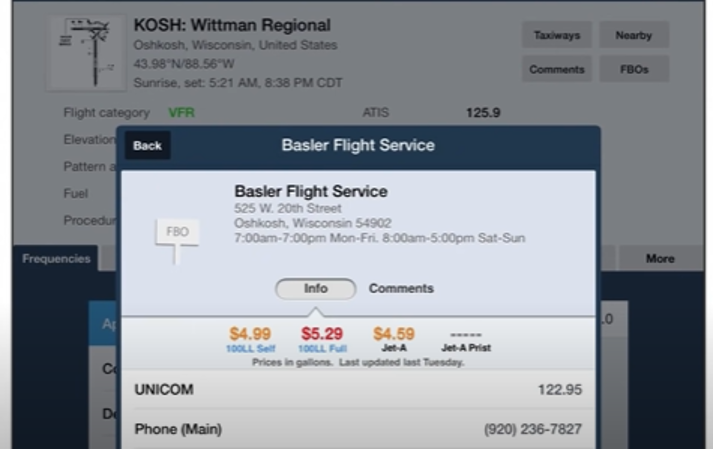
Tapping on the FBOs button at the top right will display the aviation services at the chosen airport.
The assistance includes FBOs, maintenance and services, rentals, flight schools, etc. Tapping on a business will display additional information, including their phone numbers, fuel prices, etc.
Moving on from Airports, we go to Maps. The maps tab is one tab to the right of the airport’s tab along the bottom of the screen. This is where you will spend most of your time using Foreflight.
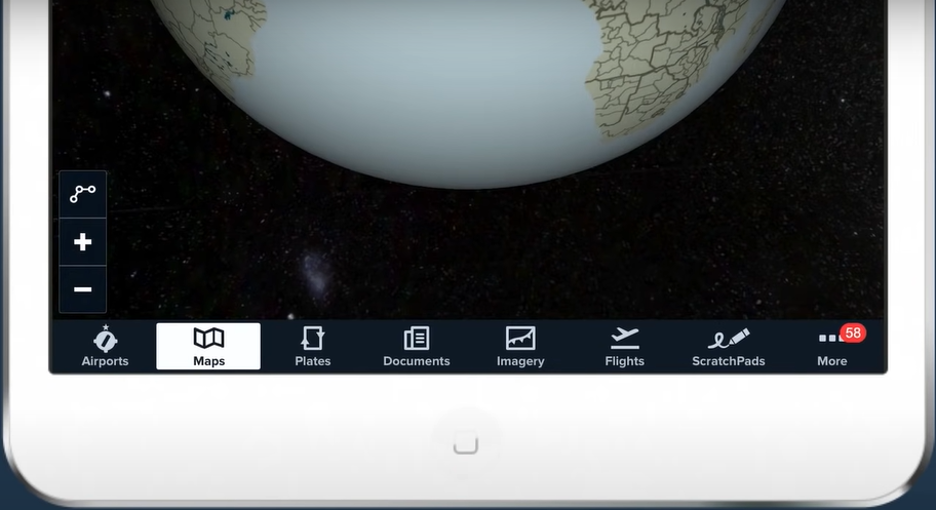
All maps on Foreflight are projected on a geodesic 3D representation of Earth.
The representation is fully interactive, and users can swipe left or right to pan the view. They can also zoom in or out with the usual pinching finger movements.
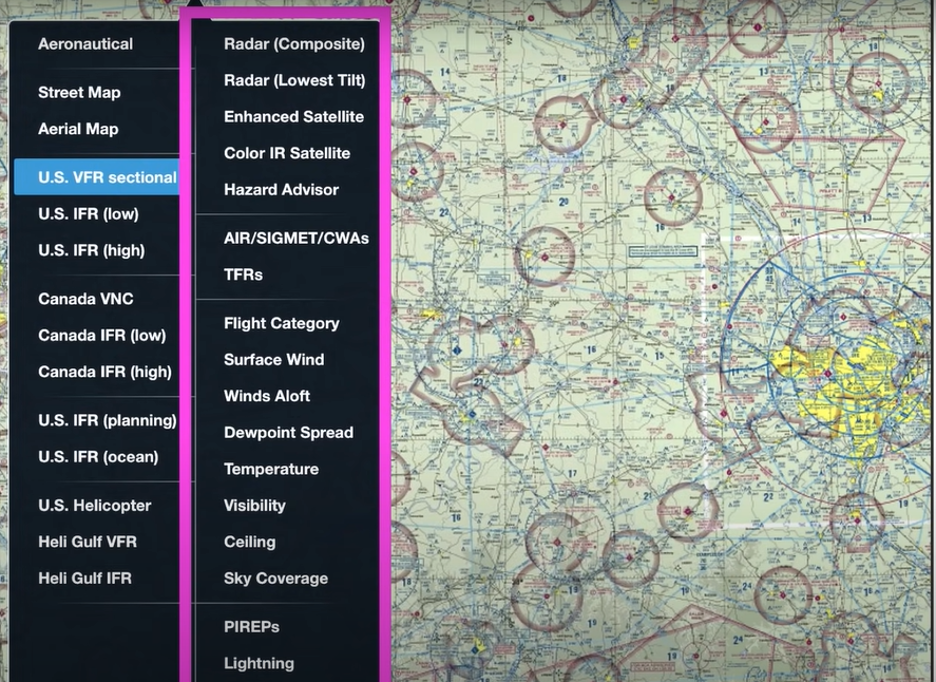
At the top left-hand corner of the map screen, there is a button that allows you to select which map you wish to view and which layers you wish to see overlaid on the chosen map.
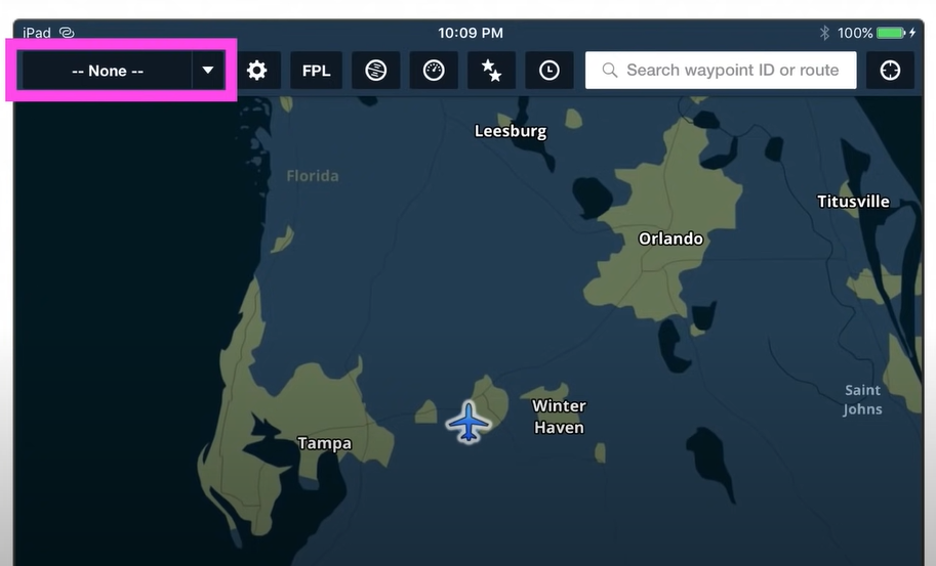
Tapping the button, you get a view that looks like this:
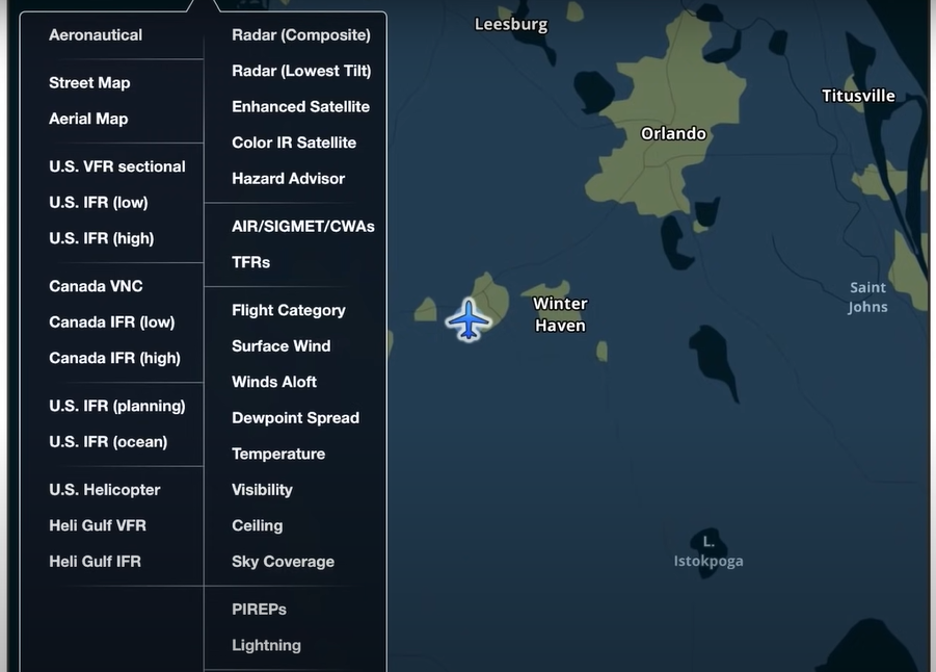
You have two columns. The left column is where you select the maps and charts you wish to view, and the right column is where you choose map layers. These are the layers of information you wish to have superimposed on your map.
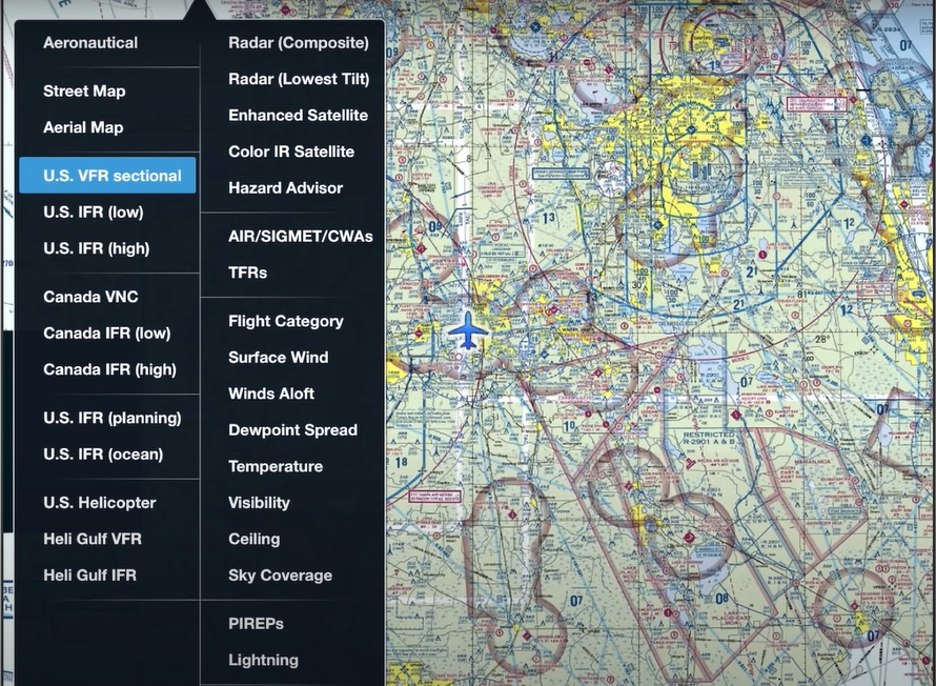
If, for example, you choose the VFR sectional map, your map view will change to the VFR sectional map for that region. As you zoom out or pan around, you will continue to see the VFR sectional map for the adjacent areas.
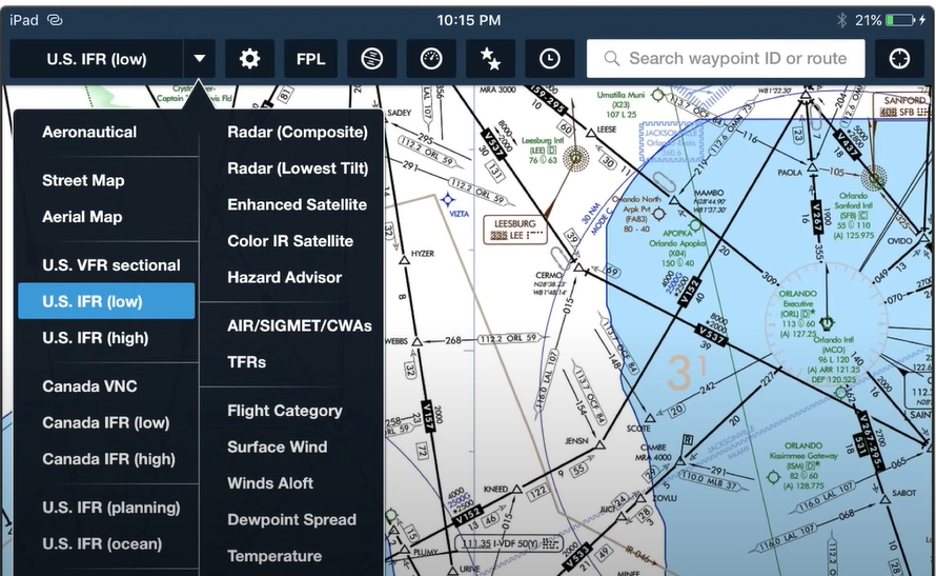
If you are doing an IFR flight, choose IFR (low), and the map changes.
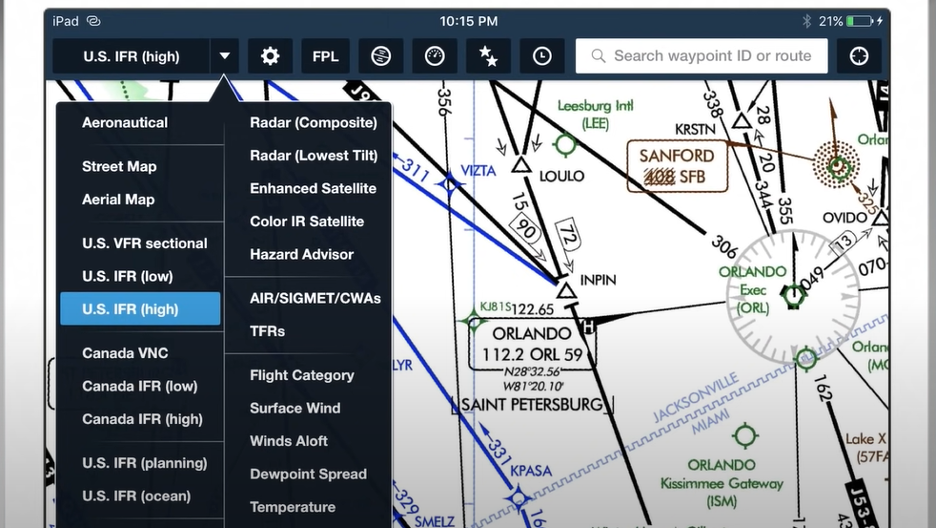
The same goes for IFR (high).
A Street Map view is also available.
Although it may not be necessary for flying purposes, it is still handy as it has street names and addresses for any point on the globe. This feature can be convenient if you arrive at a new location and need help getting around. The Aerial Map is also a neat addition and will show you satellite images from anywhere globally.
The Aeronautical Map is a unique feature for Foreflight Plus subscribers. It is a dynamic and data-driven map representation that spans internationally.
The map is dynamic because it shows the appropriate layer of information according to your zoom level. It also indicates IFR high and low information for anywhere on the globe and can thus support you on international trips.
The right column of the map selector menu is where you select the map layers you wish to view.
You can get many of these layers on the ground through an internet connection, but you will usually need an ADS-B receiver to view some or most of these layers in the air.
Once you connect your ADS-B receiver, you’ll see a notification on the top left of the Maps page. This is where you get your money’s worth from your ADS-B receiver.
Foreflight should be able to display live ADS-B traffic and weather data that it receives from your ADS-B In as the receiver connects with your smart device through WiFi.
An excellent example of this is the Radar layer.
When you select this layer, Foreflight overlays radar weather information over your map view.
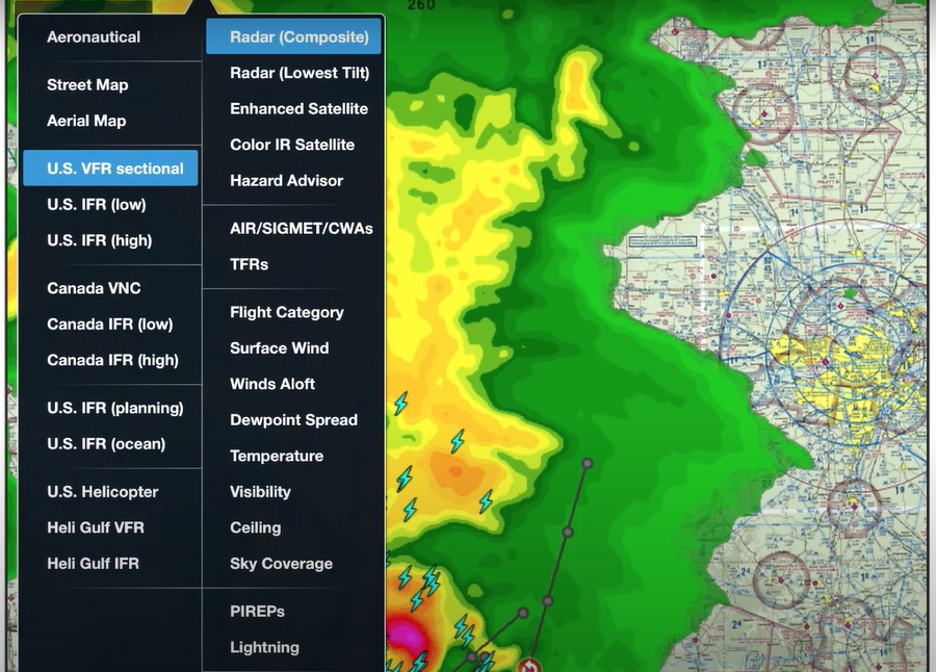
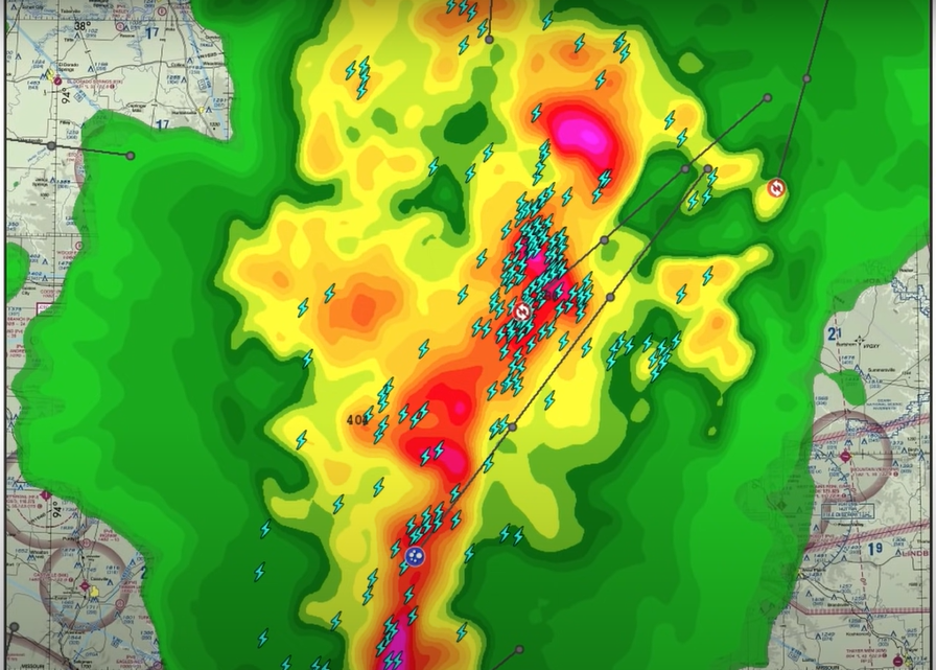
The color represents the reflectivity that was returned. You can also see lightning strikes, storm tracks, echo tops, doppler rotation, and hail signatures.
All of these weather products are available—subscription-free—through your ADS-B device.
The FAA documents a complete listing of all the traffic and weather information that you can receive through your ADS-B In unit here: https://www.faa.gov/air_traffic/technology/adsb/pilot
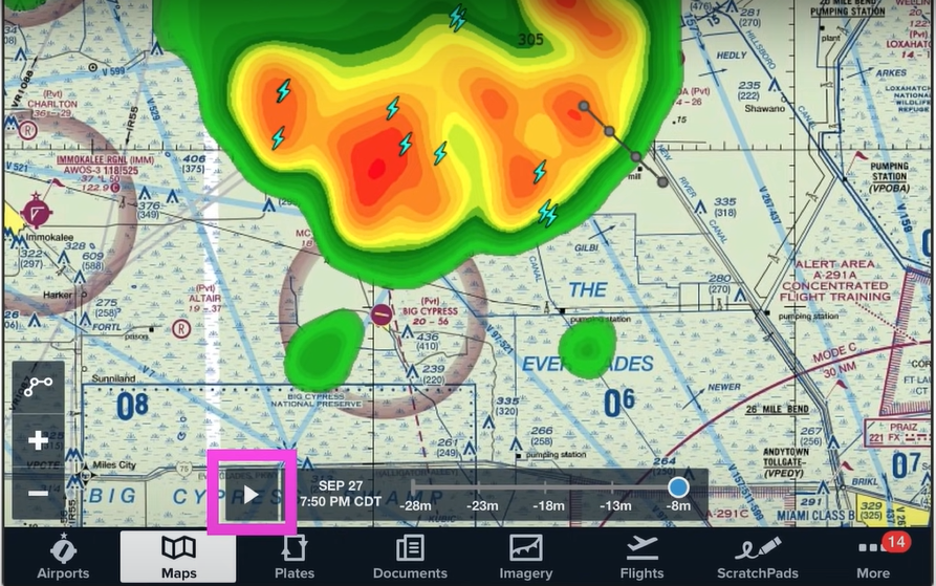
Some layers in Foreflight are capable of being animated. When viewing an animation-capable layer, you will see a play button at the bottom of the screen. Alongside the button is a timeline with timestamps corresponding to each frame in the animated representation. This feature helps you achieve a more dynamic understanding of weather patterns and how they are evolving.
AIRMET, SIGMET, and CWAs can also be viewed as a layer. You can tap on any indicated regions on the layer to see more information.
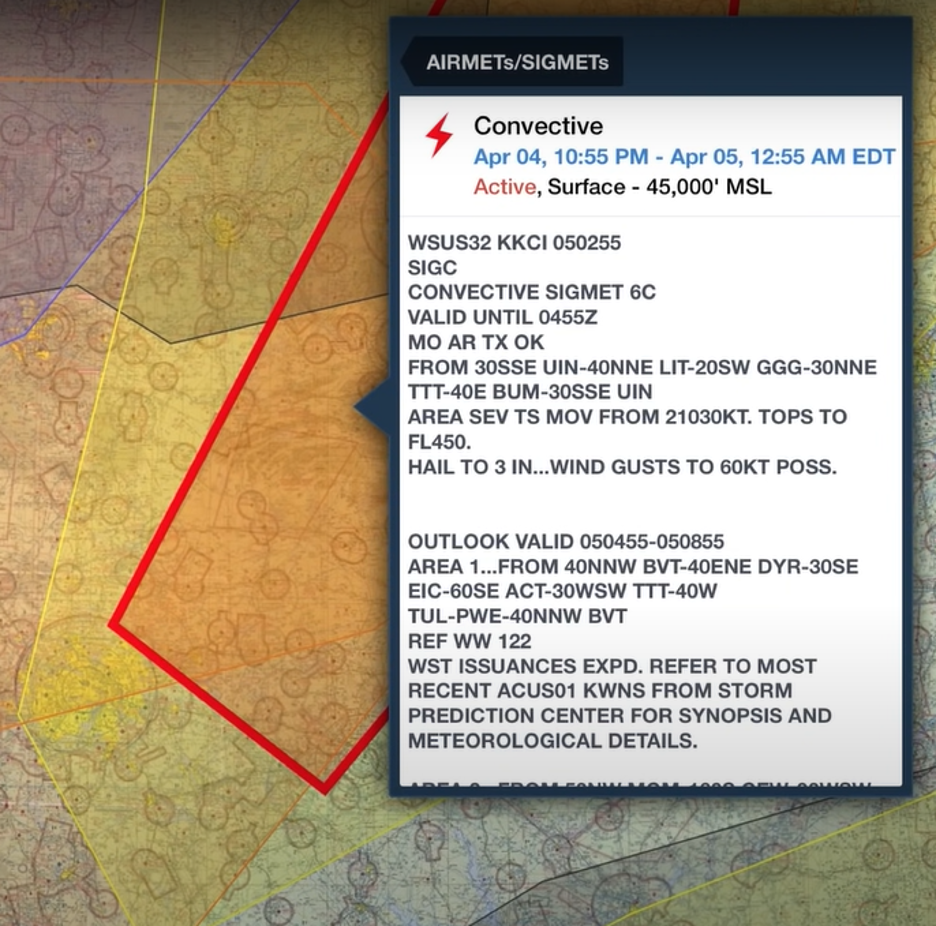
In this example, we have selected a convective SIGMET. We can see when it is active, if it is currently active, as well as its altitudes and the raw text of the weather product.
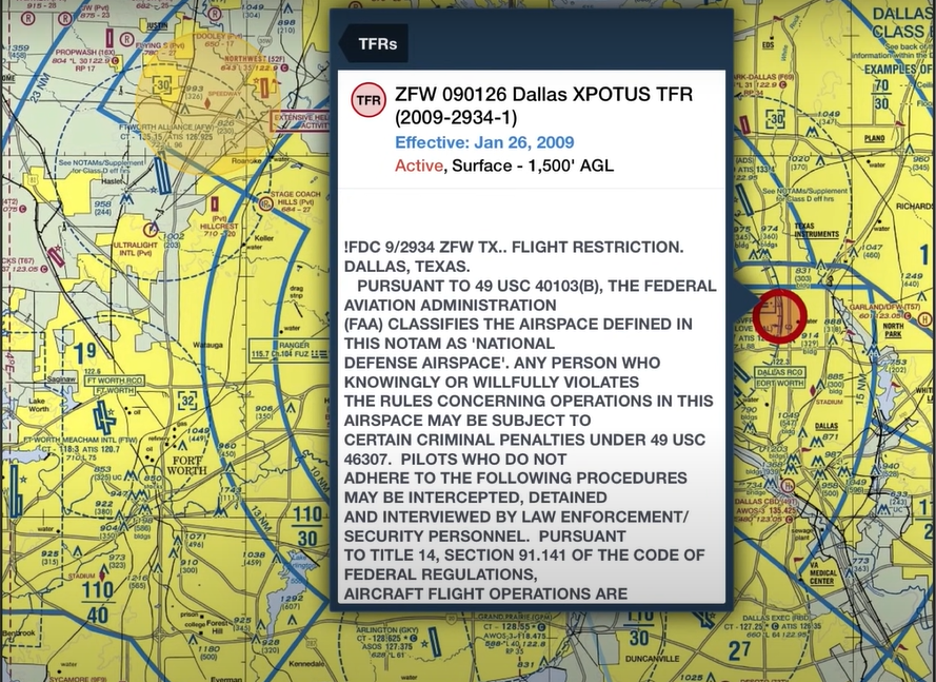
You can also view Temporary Flight Restrictions as a layer on your map.
Yellow TFRs indicate airspace that is open but will be restricted soon. Red TFRs show currently active TFRs. You can tap on any TFRs to get more information, including the raw text.
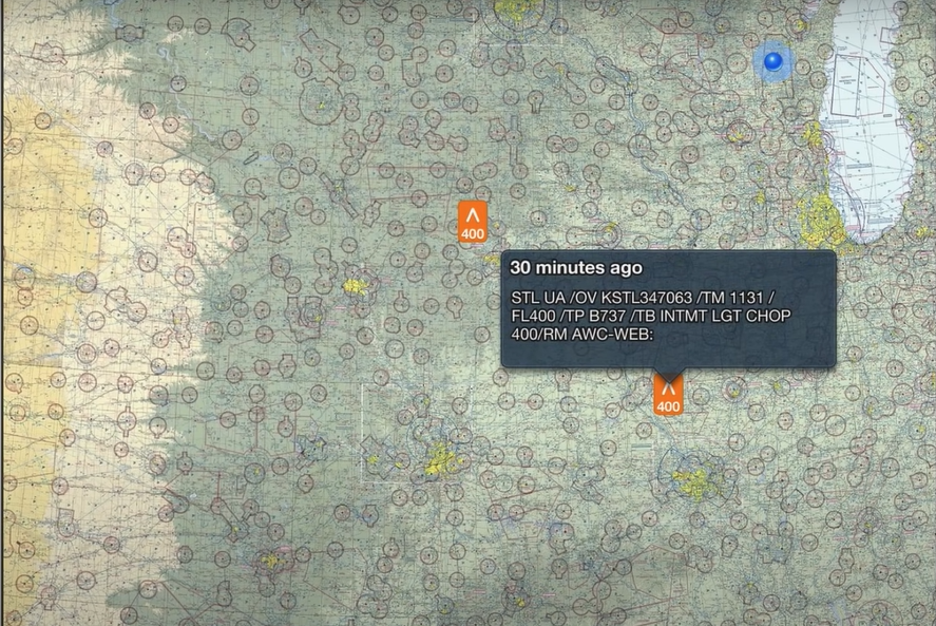
Other layers that you can visualize on a map are Pilot Reports or PIREPs.
Tapping on a PIREP displays the reported time and the report’s raw text.
These are just a few of the weather layers available through Foreflight.
As mentioned earlier, you can get these and other layers through an internet connection when on the ground. Once airborne, you can get the radar weather picture and different layers by connecting to an ADS-B receiver.
Of course, the weather is just part of the picture needed by airmen. Flyers also need timely traffic information.
Again, this is available either through the internet when on the ground or ADS-B when up in the air. Like weather information, traffic information can be overlaid on maps and viewed alongside weather information.
ADS-B traffic is enabled by default when connecting to your ADS-B receiver and can be switched on or off by toggling the Traffic layer in the Maps layer menu discussed above.
All traffic information is relative to your position. A +(positive) or a -(negative) indicates whether the traffic is above or below you.
A vector before a traffic target indicates its forecasted position in the next 60 seconds.
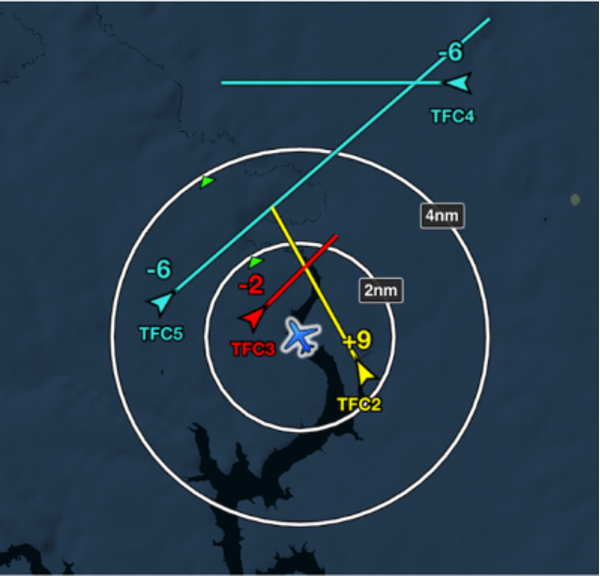
Teal-colored traffic indicates standard airborne aircraft. Yellow traffics are airborne targets within 2 nm and +/- 1200 ft of your position or are expected to be so within 45 seconds.
Red traffics are airborne targets within 1.3 nm and +/- 1200 ft of your position or expect to be so within 45 seconds.
Finally, brown indicates surface targets.
A helpful option allows Foreflight to declutter your screen by hiding traffic 15 nm away from your current position or more than 3500 ft above or below your current altitude. This option decreases the clutter on your screen by displaying only traffic targets that are close enough to require attention.
You also have the option to enable Traffic Alerts.
Enabling this option displays an alert banner on your map when a traffic target is expected to be within 1.3 nm and +/- 1200 ft of your position within 25 seconds. Furthermore, you can select an option whereby you hear the alerts audibly.

Foreflight version 13.5 and later updates assume that targets not broadcasting their altitude are at your same altitude.
Thus, they will trigger traffic alerts when expected to be within 1.3 nm of you. If this happens, the warning will indicate “Altitude Unknown.”
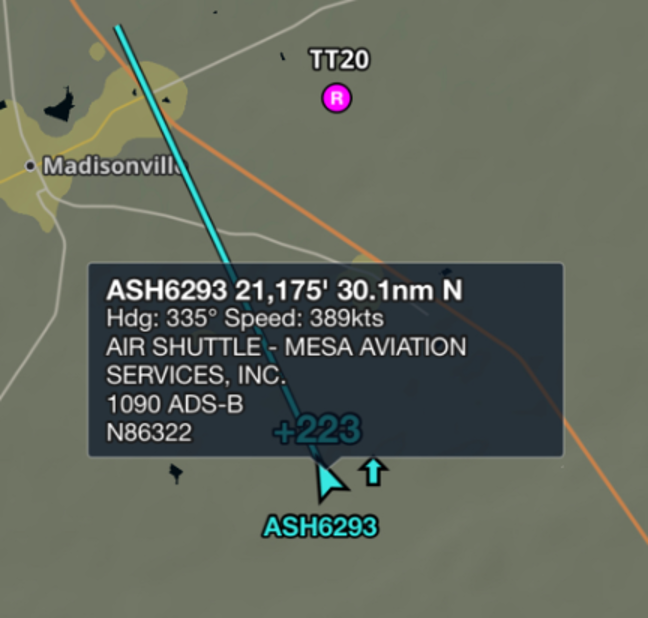
You can get more information on any traffic target by clicking on it.
The information alongside a target includes its heading, speed, tail number, call sign, and frequency (978 or 1090). Also displayed is whether the target is ADS-B, ADS-R, or TIS-B.
An ADS-B label indicates that a direct Air-to-Air broadcast received the target’s information from the ADS-B Out equipment in the aircraft.
ADS-R indicates that a ground station has rebroadcast the ADS-B message sent on the other ADS-B frequency.
TIS-B indicates that the target information was obtained from a broadcast by a ground tower.
Video Sources:
● YouTube. (2022). All you need to know about Sentry Plus – The perfect add-on to ForeFlight? YouTube. Retrieved November 21, 2022, from https://www.youtube.com/watch?v=EsPtAMl_E8o.
● YouTube. (2017). ForeFlight Fundamentals Course. YouTube. Retrieved November 21, 2022, from https://www.youtube.com/watch?v=3q5JHpb8wm0.
Website Sources:
● What traffic features does Foreflight mobile offer? (2021, August 21). Retrieved November 21, 2022, from https://support.foreflight.com/hc/en-us/articles/4406036663063-What-traffic-features-does-ForeFlight-Mobile-offer-
● FAA. (2022, April 20). ADS-B. ADS-B | Federal Aviation Administration. Retrieved November 21, 2022, from https://www.faa.gov/air_traffic/technology/adsb/pilot
Image Source: pilot_crawford via Instagram.